Image Map
Showing posts with label before & after. Show all posts

Tuesday, January 15, 2019

A Little Inspiration.....

Most of you have probably heard of or watched the new series on Netflix called "Tidying Up with Marie Kondo." I think it's a great show and I hope many of you are drawing inspiration from it. While I plan to share my thoughts on that series in a later post, for now I wanted to share a little inspiration of my own....

This client wanted a kitchen update and I was happy to help! While her kitchen was by no means in total disarray, she was a busy working mom (with four kids!) who moved into her house in a hurry, placing things randomly in cabinets, and was finally ready to organize it in a more functional fashion. 

We first started with the pantry....categorizing goods, purging expired foods, and creating zones with labels on each bin (Ex: Breakfast, Grains, Canned Goods, etc).
One of my favorite organizing supplies is a Lazy Susan! Believe it or not, it works great in pantries. If you look in the picture above, I used a Lazy Susan to organize all of her kids' condiments & PBJ supplies. Makes it easy for adults (and kids) to find what they're looking for!

Another important step was to clear the clutter on the floor of the pantry. We corralled water bottles into a bin, as well as recyclable bags in another one. Once the bin gets full, it's time to let go of a few!

Then we moved onto the drawers and cabinets in the kitchen. This "before & after" is one of my favorites. Again, we purged a few items - duplicates and broken ones - and then used Dollar Store bins to create a holding place for each category (knives, cooking utensils, etc.)

I love when I come across a cabinet in a client's home that is pretty close to empty! This was the case here, as shown in the top picture. This cabinet was located above her fridge, and was very under-utilized. We moved some things around, and were able to free up this cabinet to act as a china storage spot! A few shelf helpers did the trick and now her china will be stored in a safe & very visible space.

One of my last favorite spaces in this client's kitchen was her narrow coffee cabinet. I added a few shelf helpers and moved her keepsake mugs to the top shelf. My client was even able to pull in a few mugs from other cabinets that had been placed sporadically throughout the kitchen. Now all of her coffee supplies & mugs are in the same place!

All in all, this kitchen makeover took close to 7 hours. We were able to completely update her walk-in pantry, as well as better organize all of her kitchen cabinets. 

Please let me know if you could use my help with a similar project! 


 photo 123-sig_zpsfaf346b8.jpg

Tuesday, May 9, 2017

De-Cluttering Before a Move

A recent client called me because her realtor said she needed to organize her pantry before her house was put on the market. I was happy to help!!

This pantry was SUCH a great space to begin with; it just needed a bit of de-cluttering and categorizing. Plus, cute bins & labels always help :)
One of my favorite organizing supplies is mini hanging chalkboards. They are easy to use, and more importantly, easy to change as your family's needs change!
We grouped baking items together, as well as created a few easy-to-grab snack bins for her kids.
We grouped chips with chips and crackers with crackers, A "shelf helper" added space to an upper shelf where we placed all of her paper products and disposable utensils.
We checked for expired medicine, as well as grouped together lunch bags & reusable bags.
One more look at this updated & organized pantry!
Now this client is ready to put her house on the market and WOW some potential buyers!

I offer a variety of de-cluttering, staging, packing, and unpacking services.
Please let me know if I can assist you in your moving process.

 photo 123-sig_zpsfaf346b8.jpg

Thursday, May 4, 2017

A Two Hour Makeover: Spare Bedroom

Have you ever wondered what a professional organizer can do in your home in just two hours!? 
Well, here's your answer:
A recent client needed help organizing her spare bedroom/office and it only took us two short hours to make the transformation happen!

This is something I see time & time again as a professional organizer....it's just easier to have a "catch all" room/closet than to take the time to put the item where it actually belongs.

So, we touched every single item in the room! We decided if it needed a new home in a different room, if it should stay, or if it should be donated/sold. In just two short hours, we were able to see the carpet again (!) and even created some extra storage space in the closet.

The spare desk was being used as a "catch all" space.
Now, it is a place to display some of my client's favorite/most sentimental items.


An organized desk surface (plus organized drawers!) can make all the difference when you're trying to work from home.

The bookshelf used to store CDs, photo albums, and miscellaneous office files.
Now, it holds all of my client's art & hobby supplies!

We created clear tubs for hobby items, keepsake items, and excess office items.
They are so much easier to find now, AND they have room to grow if they need it.

What space would you like to tackle in just 2 hours!?
Let me know and I'd be happy to help!

 photo 123-sig_zpsfaf346b8.jpg

Monday, November 7, 2016

Kitchen Makeover: Part 3

As promised, here is Part 3 of a recent kitchen makeover....

First up, the freezer!

These "before & after" pictures may not look very dramatic, and to be honest, this was a pretty quick job. I just put "like" items together. (Ex: ice cream on one shelf, all the breads in a container, all the popsicles on one shelf, all the veggies in the bottom drawer.)
Same for the door of the freezer - I mainly just grouped together all the ice packs and left the frozen fruits where they were.
~~~~~~~~~~~~~~~~~~~~~~~

Now, the fridge!

I designated a shelf for each of the following:
miscellaneous, condiments, sauces/marinades, and salad dressings.
For the main part of the fridge, I put all the tall beverages (milk, juices, pitcher of lemonade) on the top shelf. Then we corralled the go-gurts into a narrow clear container. The middle drawer now holds meats & cheeses, and the bottom two drawers hold fruits and veggies. Easy peasy!

This fridge/freezer just needed a quick update, and it took 30 minutes at most! Plus, in the process, we wiped it down really good (while it was empty). So now, not only is it organized but sparkly-clean too! :)
 photo 123-sig_zpsfaf346b8.jpg

Wednesday, November 2, 2016

Kitchen Makeover: Part 2

Today, I want to show you a pantry transformation for one of my recent clients. (If you missed Part 1 of the Makeover, which included the cabinets, countertops, and under the sink.....click here.)

 This pantry was a great space, but just not being utilized properly. In the upper shelves, there were odds & ends like rubbermaids, a mixer, and lots of cups not being used. The goal for this pantry was to ONLY house food & drinks, so we found those items a new home in the newly de-cluttered cabinets. (Well, some went into the "donate" pile :)

We were able to leave the upper shelf almost completely clear! Right now, it is storing a few (new) pyrex dishes that are not being used, but they wanted to keep. The 2nd shelf now holds all their cereals and breakfast items, while the 3rd shelf holds one of their daughter's medication, plus a turntable for their spices & oils.
 Let's take a close-up at this turntable! I love these for soooo many reasons....
 The biggest challenge for this pantry was to utilize the depth of it. (It is 18" deep!!) To do that, I used a "shelf helper" on the top shelf to hold some snack bars, and put other - larger - boxes of snacks at the back. Additionally, the kids now have a designated snack bin on the front of the shelf, and 2 small bins house miscellaneous items and sauces.
 The middle shelf now houses all of their baking items. A vacant jar now holds all of their baking chips, and we made a small bin for all of their sprinkles, toppings, etc.
Last but not least, on the bottom shelf, there is a designated bin for pastas & grains, and lots of overflow room on the right for baby items like formula, jugs of water, etc.

Stay tuned for Part 3 of the makeover!


 photo 123-sig_zpsfaf346b8.jpg

Sunday, October 30, 2016

Kitchen Makeover: Part 1

A recent client needed a complete kitchen overhaul (think: cabinets, countertops, fridge, pantry, etc.) and I was happy to help!!

Before I get into the details of the makeover, I want to give you a little background on why I chose to become an organizer. First of all, I love to organize (DUH)! But second, I love to help people. And when I walk in someone's home and they are completely overwhelmed & close to tears, my heart goes out to them. I want to help them in any way I can, and usually, that starts with organizing. So, this client was more than just a little overwhelmed when I first saw her kitchen. Which is evident since her countertops were overflowing with food & other items that belonged in the pantry and cabinets.
She's a busy mom of three, and the kitchen countertops and table became the catch-all for...
well, everything.

I was BEYOND excited to help this client reclaim her kitchen, and best of all, her family's kitchen table! As I was leaving, one of her daughters started laying out placemats for their dinner that night. She was so excited to have the table cleared off so they could have family time. Warmed my heart!

Though I was itching to move all that excess food from the countertops to the pantry, I couldn't do that without de-cluttering her kitchen cabinets first, to make room for things that didn't belong in the pantry! Did you follow that!? :)

We started with the cups & glasses.....my client got rid of quite a few that they didn't need/want, and then I placed them back into the cabinet by types: mugs, water bottles, glasses, baby stuff, etc.
Her pots & pans were being stored in a cabinet that had a veeeery deep right side. I decided to store some appliances in that corner that weren't being used much, and added a lid rack to organize her lids. I grouped the saucepans by size & shape, and made a spot for her most-used pyrex dishes.
The space under kitchen sinks is always a precarious one, and often under-utilized as well. I designated a bin for cleaning items and another bin for paper products.
And then on the far left side of the sink cabinet, I used a 2 tiered organizer similar to this to hold excess paper towels as well as dish-washing items/sponges.


In this same organizing session, we were able to overhaul her pantry! But I will save that for the next post, Part 2. We literally organized every single cabinet in her kitchen, but I will spare you all of those pictures. There were a lot!

I just want to say that I am SO proud of the work we did in the kitchen, and even more so of my client for being brave enough to let me into her house. I *promise* you, I never walk in to a client's house & start to judge. I am solely there to help. And a big reason I take all of these before & after pictures is so that my clients can see how much progress we've made, which will hopefully motivate them to stay organized and never get back to that "before" photo.

Please let me know if I can help makeover your kitchen!
And stay tuned for Parts 2 and 3 of this reveal.....

 photo 123-sig_zpsfaf346b8.jpg

Monday, October 24, 2016

A Client's New Command Center


Recently, I had a client who was in desperate need of a family command center. (If you've never heard that term, click here to read a blogpost I did about them. Every family needs a command center in their home!)

She has 3 daughters, and was on the right track with her set-up (pictured below). She had each girl's backpack hung at their height, and then she intended to put a picture into each frame to denote whose hook belonged to who. While I DO love that idea, she really needed a system to deal with all the paper coming into the house.....birthday invitations, dance schedules, notices about school, mail, etc.
 So, since this was the biggest wall in her entryway, we moved the backpacks over to an adjacent wall, and my client purchased a new piece of furniture to serve as the heart of our new command center. As a bonus, she found 4 canvas bins that fit perfectly inside! Each family member now has a bin to hold purses, gym bags, dance bags, or even soccer items. She let each girl pick out their own colored bin, AND write their name on their hanging chalkboard, giving each of them a bit of ownership in the whole process. (And hopefully this will make them more willing to actually put their things in the cubbies!)
Other notable aspects of the command center, from top to bottom:

-A dry erase calendar, where a different colored marker can denote each child's activities
-3 cork tiles (one for each girl) to hold invitations, important notices, etc.
-A wooden "D" on the wall; just a little personal touch for their family's last name
-3 letter trays: the top tray will have two folders for mail, one marked ACTION and one marked INFORMATION. The other two trays will be for the girls school notices, etc.
-A small tray will hold keys & sunglasses
-A letter organizer will transform into a charging station once the family loads up all their devices and gets a surge protector to fit all the cords :)

~~~~~~~~~~~~~~~

While the command center is not 100% complete yet (they still need to add a family picture to the frame, as you can see!),  I still wanted to show it because I absolutely ADORE this space! Let's take one more look at the before & after, side-by-side:


I'm hopeful that having ONE central place for this busy family of 5 will help streamline the process of all the paper coming into their house. I know all too well how overwhelming that can be!


 photo 123-sig_zpsfaf346b8.jpg

Wednesday, October 19, 2016

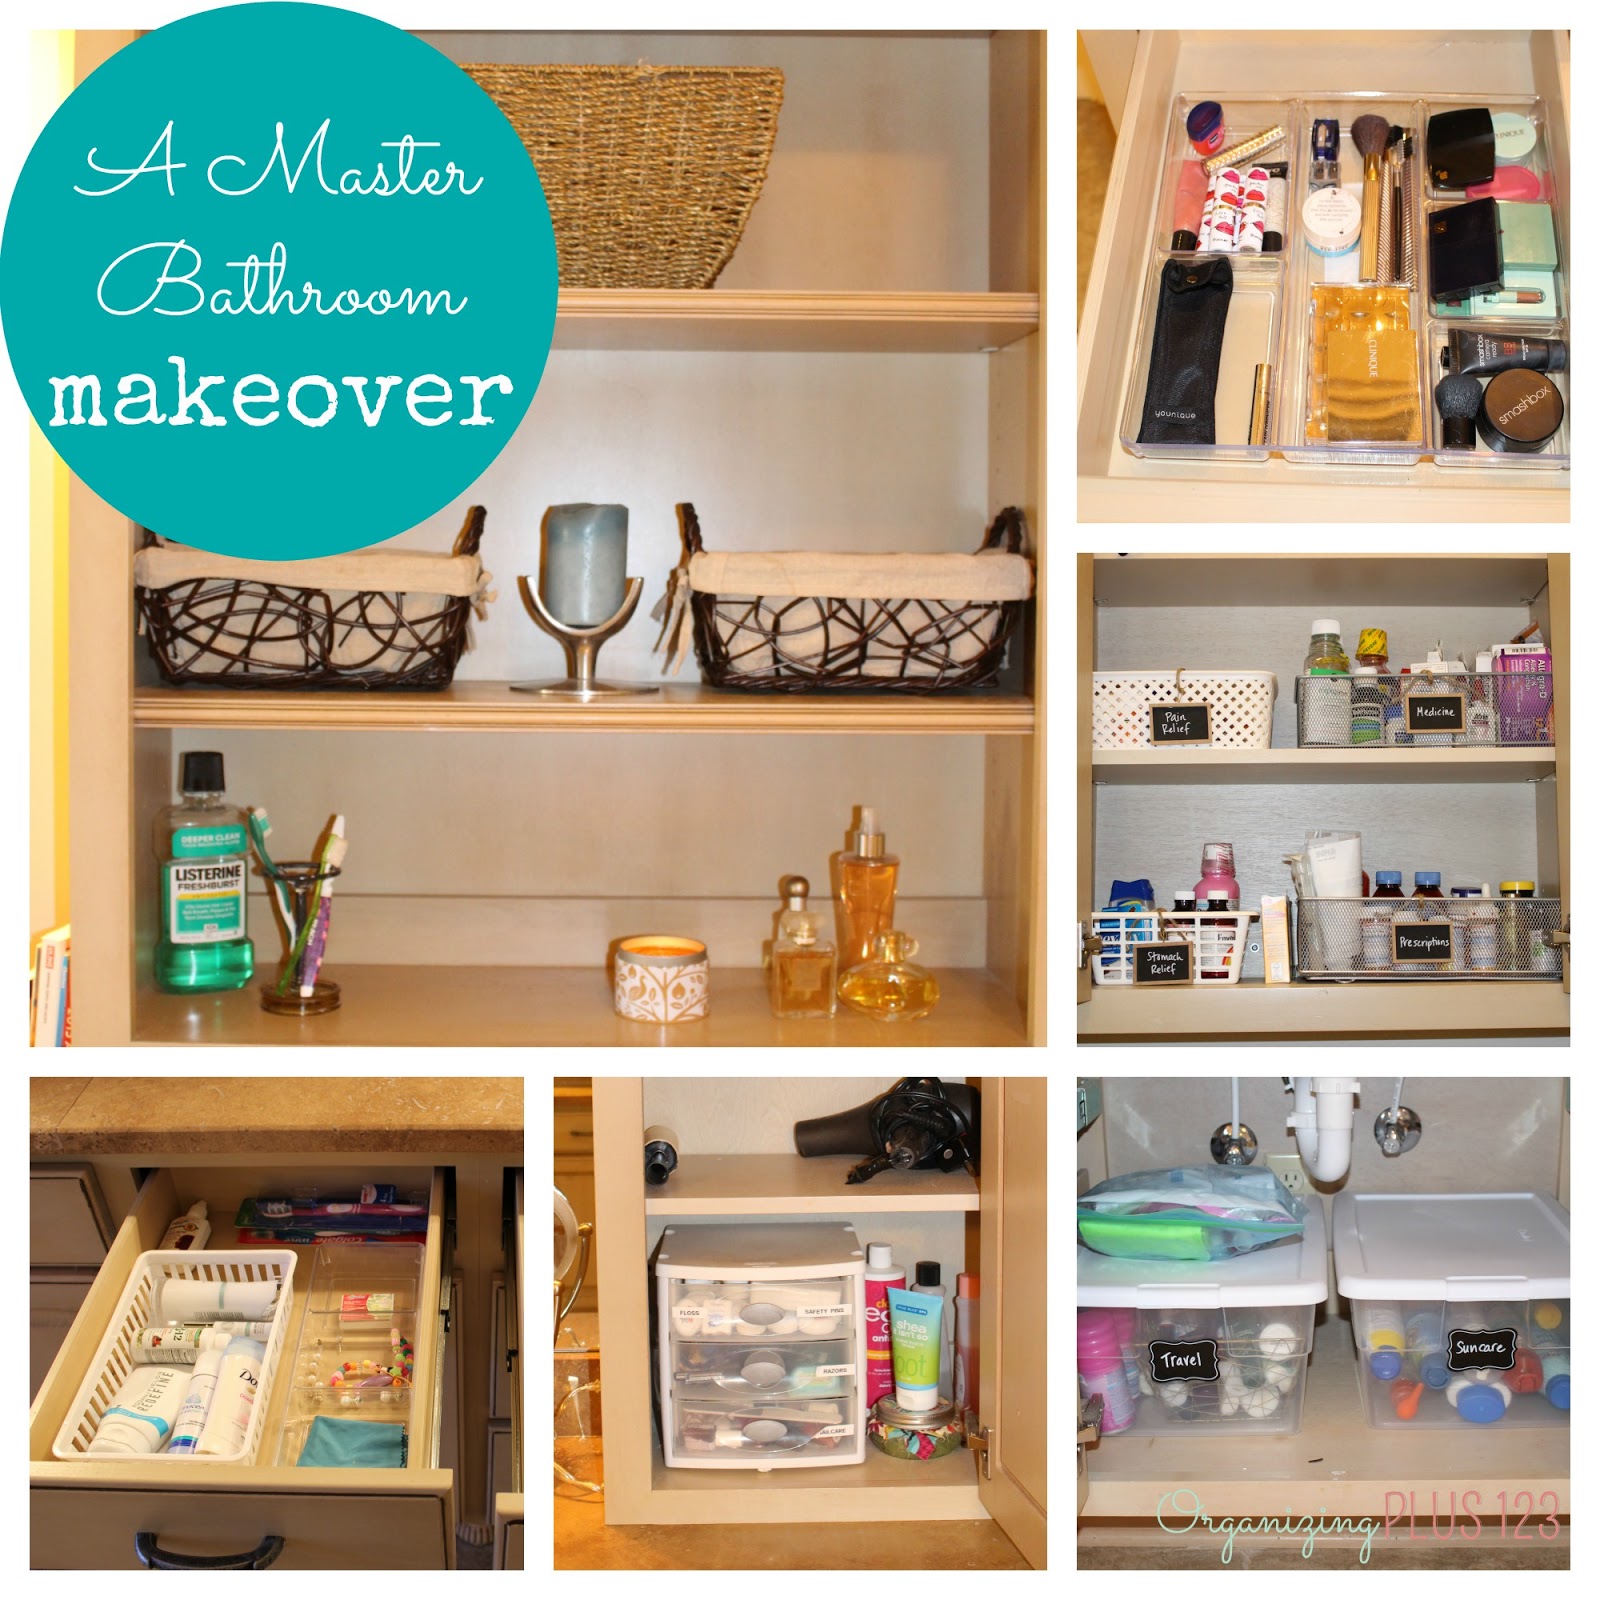
A Master Bathroom Makeover!

Y'all....it's official! I have finally found my dream master bathroom!

Seriously, it is the most beautiful thing and bigger than my bedroom. If I had a master bathroom like this, I think I'd take baths all day in the claw foot tub, and spend hours sitting at the pretty vanity getting ready.

Needless to say, I had SO much fun helping a recent client de-clutter her bathroom....


The focal point right when you walk in is this beautiful open shelving & cabinet system. It was pretty much functioning as a medicine cabinet, so we decided to move those items
elsewhere and make it "pretty!"

Much better, right?!
 We created "Daily" and "Nightly" drawers for both husband & wife.
(Of course, the wife has a *few* more items in hers!)
We used simple bins from the Dollar Tree and acrylic dividers from Target.
Some of my faves!
Under one of the sinks, there was a little bit of everything. We created a Sun Care bin and a Travel bin, which holds all those travel-sized toiletries (and freebies you get from hotels)! My client travels often for work, so we left her large Ziplock bag ready made with travel toiletries for her next trip on top of the Travel bin.
 On the other side of the bathroom sits this amazing vanity!!! As you can see, it just was a little bit cluttered and didn't have a rhyme or reason to it. We transformed this spot by dedicating these shelves & drawers to all things "beauty".....hair tools & products, nail care, make-up, lotions, etc.
And the best part is - now she has empty shelves & room to grow!

Close-up on the shelving on the right

Close-up of shelving on the left
We just needed an acrylic organizer to hold all of her pretty make-up!
 Last but not least, there was a medicine cabinet over the toilet that was not being utilized properly. (I apologize - no "before" picture.) It was holding SOME of the family's medicine, but it was also spread out in 3 other locations in the house. We corralled it all, and I organized it into a few categories: Pain Relief, Stomach Relief, Medicine, and Prescriptions.
Now there is one central spot for medicine, and it's out of their children's reach.
Win-win!

Who would have thought that organizing a bathroom could be so much fun!?
(Well, my client may not have thought it was fun, but I did!)

 photo 123-sig_zpsfaf346b8.jpg