Image Map

Tuesday, January 15, 2019

A Little Inspiration.....

Most of you have probably heard of or watched the new series on Netflix called "Tidying Up with Marie Kondo." I think it's a great show and I hope many of you are drawing inspiration from it. While I plan to share my thoughts on that series in a later post, for now I wanted to share a little inspiration of my own....

This client wanted a kitchen update and I was happy to help! While her kitchen was by no means in total disarray, she was a busy working mom (with four kids!) who moved into her house in a hurry, placing things randomly in cabinets, and was finally ready to organize it in a more functional fashion. 

We first started with the pantry....categorizing goods, purging expired foods, and creating zones with labels on each bin (Ex: Breakfast, Grains, Canned Goods, etc).
One of my favorite organizing supplies is a Lazy Susan! Believe it or not, it works great in pantries. If you look in the picture above, I used a Lazy Susan to organize all of her kids' condiments & PBJ supplies. Makes it easy for adults (and kids) to find what they're looking for!

Another important step was to clear the clutter on the floor of the pantry. We corralled water bottles into a bin, as well as recyclable bags in another one. Once the bin gets full, it's time to let go of a few!

Then we moved onto the drawers and cabinets in the kitchen. This "before & after" is one of my favorites. Again, we purged a few items - duplicates and broken ones - and then used Dollar Store bins to create a holding place for each category (knives, cooking utensils, etc.)

I love when I come across a cabinet in a client's home that is pretty close to empty! This was the case here, as shown in the top picture. This cabinet was located above her fridge, and was very under-utilized. We moved some things around, and were able to free up this cabinet to act as a china storage spot! A few shelf helpers did the trick and now her china will be stored in a safe & very visible space.

One of my last favorite spaces in this client's kitchen was her narrow coffee cabinet. I added a few shelf helpers and moved her keepsake mugs to the top shelf. My client was even able to pull in a few mugs from other cabinets that had been placed sporadically throughout the kitchen. Now all of her coffee supplies & mugs are in the same place!

All in all, this kitchen makeover took close to 7 hours. We were able to completely update her walk-in pantry, as well as better organize all of her kitchen cabinets. 

Please let me know if you could use my help with a similar project! 


 photo 123-sig_zpsfaf346b8.jpg

Wednesday, January 9, 2019

My Favorite Product of 2018

Hello Friends!

I hope your year has gotten off to a good start. Have you made a resolution to be more organized in 2019? If so, I have just the product for you. And if you've worked with me before, you know that I *love* a cute bin or basket. Check out this link if you want to see my favorite products from a few years ago. Most of them still hold true! But, this year, my favorite product might come as a surprise.....

My husband bought me this product as a stocking stuffer 2 years ago and I am *still* so in love with it. Yes, I realize I am odd :)

Click here to see the product description from Amazon. It is a $9 grocery checklist that allows you to check things off as soon as you run out of them. I make a weekly grocery list every Saturday morning, and this product helps the process run so much more quickly! (Example: as soon as you use the last of the cayenne pepper, check it off on the list. Same with the frozen waffles. And pretzels. And so on and so on).


This may seem like a very simple concept - and it is! - but that's why it works. At a moment's glance, you can see what you ran out of and what you need to buy for the next week. It also makes grocery shopping a breeze since all the items are broken down into categories for you already. 

Now, I realize that some of you (most of you?) may use an app for your grocery shopping. I know there are a lot of great ones out there, and I'm not knocking them by any means. But for me personally, this is the method I like to use. Guess I'm "old-school." Give it a try if you are curious!

And.....if you need help organizing your house, please comment below or contact me 
via text at (205) 310-0406.

Wishing you all a very happy (and organized) New Year!


 photo 123-sig_zpsfaf346b8.jpg

Tuesday, March 6, 2018

Tuesday Tip: Start Small

Is anyone out there overwhelmed when it comes to organizing?!?!?

If so, I have a piece of advice for you: START SMALL!
What does that mean?!

It means that before you tackle a whole room - which is a VERY daunting task - you need to focus your energy on organizing one small part of that room. A perfect example is your kitchen.... instead of opening up every single cabinet and trying to decide what to get rid of, what to move around, etc. you need to just organize ONE cabinet or ONE drawer.

Personally, I love to start with a client's junk drawer, because they always have such a great impact when you're done. See what I mean?


I bought the teal drawer organizers at Walmart, but similar ones can be found at the Dollar Store, Target, or TJ Maxx. For under $10 and 20 minutes, look what we did!! We categorized by item.....condiments/sauce packets, batteries, chargers/cords, etc.  

Once you've organized a small space, it will give you the motivation & confidence to organize even bigger areas. Maybe not all at once (!) but that's okay. Set a timer when you have 30 spare minutes, and tackle another cabinet or drawer. 

Good luck and I'd love to see any of your before & after pictures in the comments below!

 photo 123-sig_zpsfaf346b8.jpg

Tuesday, February 6, 2018

My Guest Bathroom Makeover!

It's been awhile since I had a reveal of my own to share!

And since lately, I seem to be organizing quite a few *bathrooms* ..... I thought I'd show off the recent remodel we did on our guest bathroom.

 Keep in mind: our house was built in 1950. So, while I love so many parts of it and its' historic charm.....I have been *done* with this bathroom for awhile and wanting to update it. This upstairs bathroom doubles as a guest bathroom and my son's bathroom. With that being said, the main thing we were needing was storage space! So, out with the old pedestal sink and in with the new vanity! 

We also removed the old towel bar and installed 2 new ones on the back of the door. We replaced the old soap inserts with new ones, and bought a new mirror as well. A 4-tier basket container was added to the left of the vanity to hide an old gas heater. It would have cost a small fortune to have it removed from the tile, so we opted to cover it up instead :)
 To say I'm happy is an understatement!!
We gained lots of counter space, which was MUCH needed!
Plus a few drawers, and room underneath for baskets.
 The woven baskets underneath hold extra toilet paper, Kleenex, and my son's spare set of towels.
 The drawers have these built-in dividers! They are in a U-shape so that they don't interfere with the plumbing. So, the drawers can't hold a lot, but they hold all of my son's daily toiletries. (And the bottom drawer is completely empty in case guests need it!)
 The wall above the toilet was completely bare, so I added just a few little things to spruce the space up. (When in doubt, hang a picture of your kids!)
 Let's take one more look....
And although we did not update the linen closet, I wanted to show that as well....

We removed the door years ago, just because it's a small space that's hard to get in and out of.
I covered two old diaper boxes with wrapping paper, and created a space for all the guest towels. I also covered the shelves with contact paper because they were old & grimy (remember: 70 year old house)!

 And these 3 baskets hold all of the kids' items like medicine, first aid, extra toothpaste, etc. I attached mini chalkboards with the help of Velcro dots. So the kids have no excuse when I tell them to go get a Band-Aid! :)
And that's my guest bathroom makeover. Hope you enjoyed it!


 photo 123-sig_zpsfaf346b8.jpg

Friday, January 12, 2018

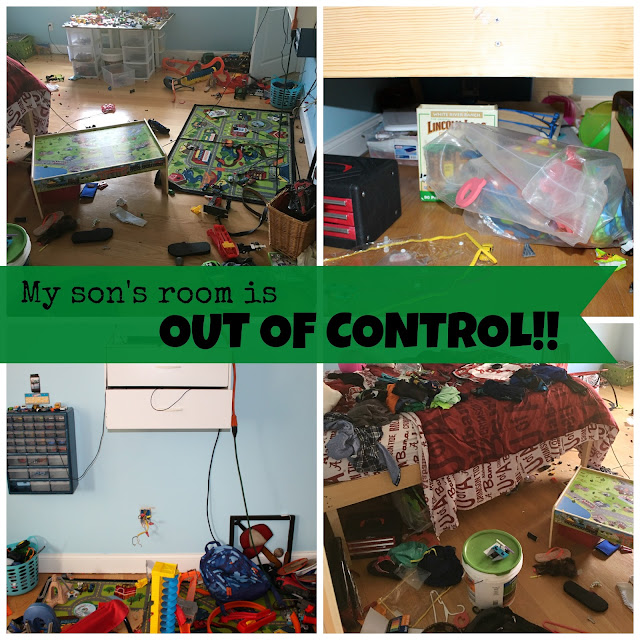
My son's room is OUT OF CONTROL!!

If you have ever screamed muttered these words before, you are not alone!!

A recent client needed help with her 8 year old son's room.
Having a 10 year old son myself, I was up for the challenge!! #legoseverywhere #sendhelp


Here are a few "before" pictures of the room:

The thing was, this mom already had a *ton* of great organizing pieces in her home. She just wasn't using them in the most efficient way! 

My favorite thing about this boy's room was the Lego area his dad created. There were four 3 drawer cart units that held all of his legos. And on top, a huge area for him to build. It was great! Her son just needed to utilize it better and not spread legos all over his floor :) Once it gets too overwhelming to clean up - whether you're 8 or 38 - it's easier just to leave it be. So, we cleaned up the trails of legos all over the room, and hopefully it will stay this way. 

This client also had three amazing pieces of furniture not being utilized.....these wooden cubbies and the metal locker. I bought a few navy bins and voila! This turned into a storage for his favorite books, toys, and served as a dresser for a few clothing items (in the navy bins).
The closet also needed a makeover!
We got rid of the hanging organizer and brought in another unused piece of furniture - a bench for his shoes and sporting good items.

All in all, this makeover only took a few hours.
Contact me if your son's room is in need of a transformation!!


 photo 123-sig_zpsfaf346b8.jpg

Saturday, January 6, 2018

A Playroom Overhaul

If your playroom has become overrun with toys since Christmas ended, you are not alone!!

I recently helped a client give her *very large* playroom closet a makeover.
In just 3 hours, look at what we accomplished!!


We started on the left side of the closet, and cleared everything off the shelves. As you can see, she had quite a bit of games, puzzles, and craft items. We pared them down and then utilized the drawer carts she already had. Now they are the new home for all things crafty that she doesn't want her little ones to see! (Think: Play-Doh, paint, etc.)
 View of the upper shelves on the left side:

 As for the middle of the closet, our main goal was get everything off the floor (so that they could actually walk in their walk-in closet :) We designated the very top shelf for items that her older kids had outgrown, and that she was saving for her baby. We chose to display them, rather than throw in a large Rubbermaid tub, so she wouldn't forget what she had :)

On the right side of the closet, we moved all of the hanging items (dress-up clothes) upstairs to her daughter's room. Then we relocated all of the gift-wrapping supplies to a different closet. That made way for a whole new piece of furniture to come in and store toys! This furniture piece - a cube organizer - was actually already in her playroom. We moved it into the closet to clear space in the playroom for the kids to have more space to move around.
Let's take one more look at this cube organizer. I love all the cubbies!
And we used the top shelf to store oversized toys.

Although a playroom makeover can seem daunting, it's not hard once you have another set of hands (me)! We did all of this in just under 3 hours.

And the best part? The 4 year old's reaction when she came home from school: "Mommy, you found all my toys!" :)


 photo 123-sig_zpsfaf346b8.jpg

Thursday, January 4, 2018

New Year's Special !!

Who wants to start out 2018 with a less cluttered & more organized home?! If so, I'm happy to help. Make sure to take advantage of my New Year's Special....for a limited time only! 

To make an appointment, comment below or click here to find me on Facebook! 


*Must be redeemed by February 28th. Limit one special per person.

 photo 123-sig_zpsfaf346b8.jpg