Image Map
Showing posts with label artwork. Show all posts

Thursday, June 16, 2016

Organizing Your Kids' School Memories

Is there anyone else out there relieved that it's summer, simply because it means that your kids are not bringing home 1,046 pieces of classwork & artwork each day?! (It's ok to raise your hand.)
 
Now, don't get me wrong. I want to know what they are learning each day. I want to see if they did well on their homework. I want to see what masterpieces they create at school. And oh, how I love anything with handprints!!!
 
{But seriously, the amount of paper they bring home can be overwhelming.}
 
Because this is by far the #1 thing my friends & clients ask me my opinion on, I'm going to let you in on a little secret:

I throw away most of it.

Now, you can judge me if you want. Or call me a bad mom. Or say, "oh, my kids would have a fit if I did that!" But, I'm here to tell you that I learned early on (my kids are 6 and 8 now) that it is not humanely possible to keep every.single.piece.of.paper my kids bring home. It's just not. Unless you want to fill up a storage unit with their paperwork & artwork from Pre-K up until they graduate high school!

Now, my system may not be for everyone. But, for those interested,  I wanted to share the system that I've found to work the best...
 
Everyday after school, I put the contents of their folders into a hanging file on the wall. Each kid = own folder. See below; this is the "command center" in my house:
 Then, at the end of each week, I go through the folders and only pull out only a few pieces to keep. A painting they were really proud of, a math test that we studied really hard for, etc. And the keepers go into tubs (pictured below).
 
*More on that later*
Let's back up for a moment. Because I realize that most of you are probably sitting on a few hundred pieces of paperwork/artwork from your kids' most recent school year right now. You didn't whittle it down during the year, and now you're staring at a huge pile and you're completely overwhelmed. Maybe you have 5 years of school memories staring at you! Well, I'm here to tell you that NOW is the time to get a handle on it.
 
For one hour a day, while your kids are in summer camp, or maybe even after they go to bed..... set a timer for one hour. Look through each pile to narrow down the pieces you really want to keep. If you have 27 pieces of artwork that have a cute little handprint on them and you can't bear to let one go, you must. Keep a piece or two from the beginning of the year, some from the middle of the year, and one or two from the end of the year. It's that simple! Same with pieces with their cute little handwriting....keep a few pieces throughout the year to show their progress. And then throw.the.rest.away. I am giving you permission.
 
Once that timer goes off, walk away from the piles. Because yes, you will be creating a lot of piles here! Do this for one hour a day for maybe a week, and I guarantee you will make huge progress and not be so overwhelmed!!!
 
Now for the fun part......Once you're finally down to the paperwork you want to keep, it's time to create a system. I got these plastic tubs at Office Max but really you can find similar ones anywhere. Click here to find the link to mine.
 
But the real key to my system is the folders. Get 2" expandable hanging folders like these.
Designate one folder per grade level, starting at PK-3. And I have mine going up to grade 12.
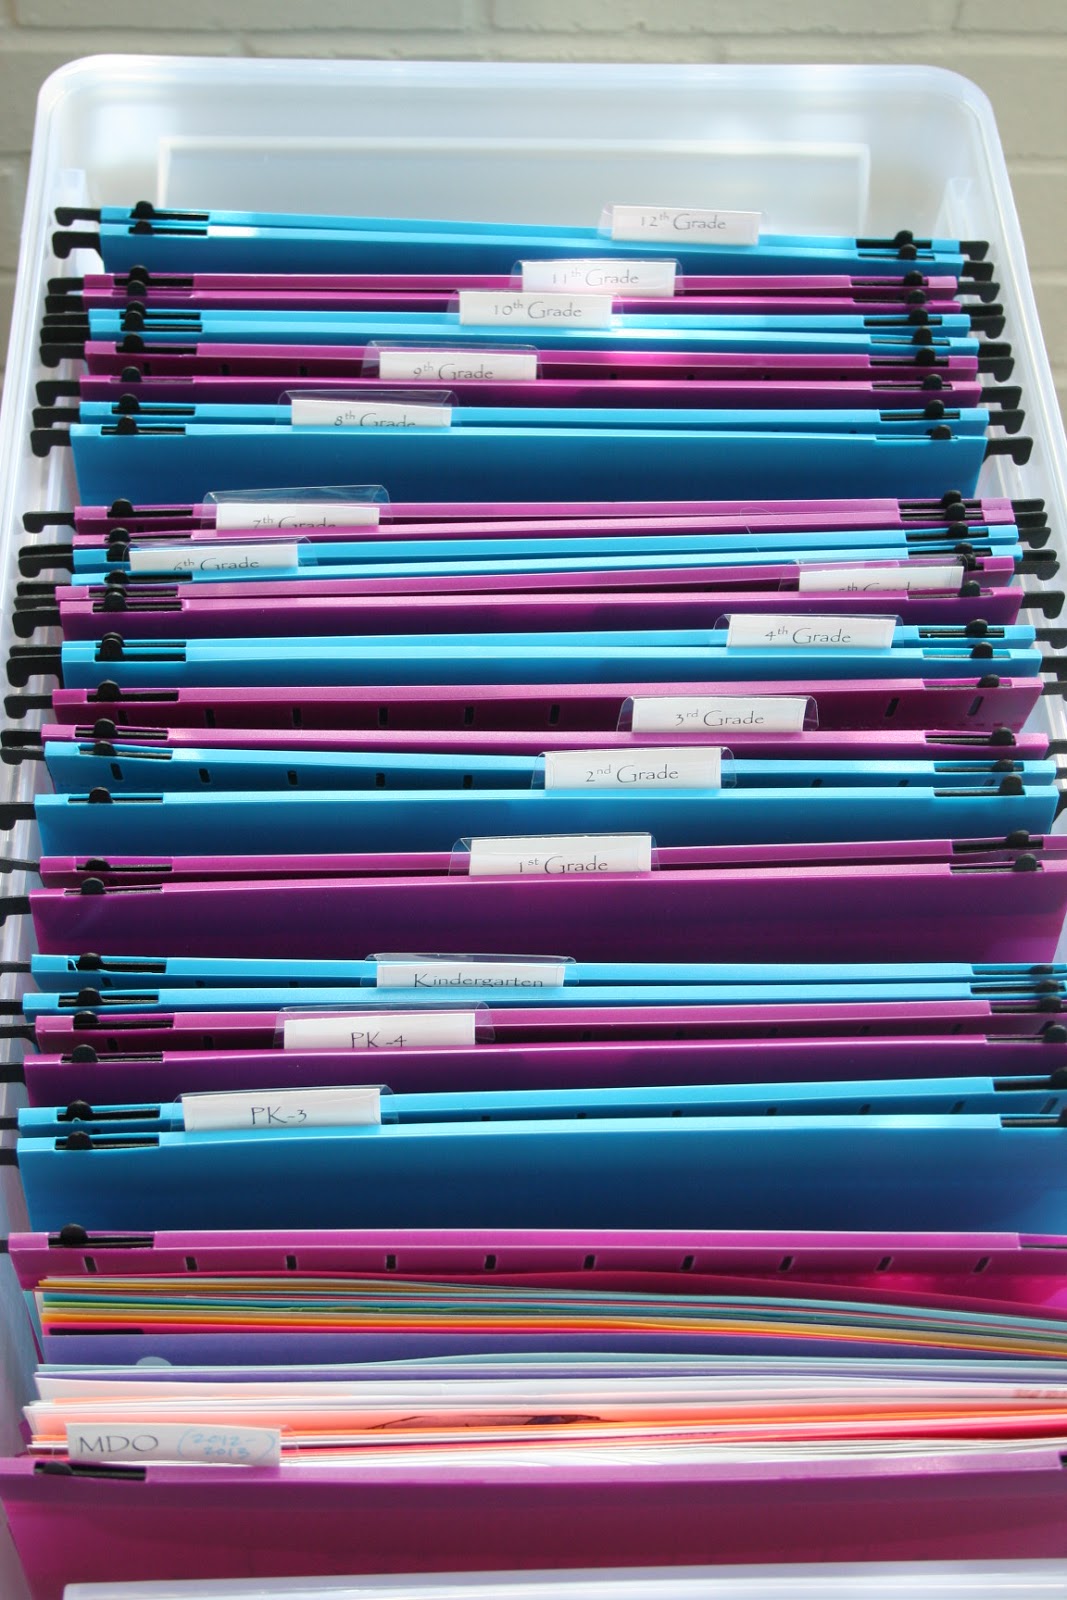
 
 
I made some simple labels in Microsoft Word, and voila!
You have a school memory box for your child.
 

 photo 123-sig_zpsfaf346b8.jpg

Wednesday, September 30, 2015

Back-to-School Series: Organizing Kids' Artwork

For the last post in my "Back-to-School" series this month, I wanted to touch on a subject that I've covered before......dealing with the oodles of artwork & papers your kids bring home from school.
 
Did you just cringe?!
 
Yes, it can be overwhelming, and it's hard to know
1). Where to put it and
2.) What to keep!
 
(And no, the answer to #2 is not "All of it!")
 
Please click here to read a previous post about organizing artwork and
creating memory boxes for your children.
And if you still feel overwhelmed, please contact me for an appointment; I'd love to help! :)


 photo 123-sig_zpsfaf346b8.jpg

Tuesday, June 30, 2015

Peek Inside: A Professional Organizer's House {The Playroom}


It's that time again!!
{Translation: if you're nosy, this is your favorite post of the month.....because you get to PEEK INSIDE my house!}
 
Believe it or not, this is one of my favorite posts to do each month too. I know how much I enjoy looking at how other people have organized (& decorated) their homes, so it makes me happy to give you a glimpse of mine, a room at a time.
 
This month - and last month, too - we have been talking about organizing all things in the dreaded playroom....artwork, DVDs, games, toys, and electronics. It can be a bit overwhelming, I know. Hopefully you've found some good organizing solutions this month on the blog though!
 
And without further ado, I present.....My playroom.....
 
This room is the heart of our home. It serves not only as the playroom, but the family room. It houses the bigger of our 2 TV's (the other - smaller - one is upstairs in the master). We gather in here to watch "America's Funniest Home Videos" on Sunday nights (yes, that is still on!), we play board games in here, and it's where we congregate when family is in town. It's not a huge room, but it has oodles of storage space. Surprisingly, I haven't figured out a way to use it all yet! (Good problem to have, I know.)
 
I adore the plantation shutters and the built-in bookcases flanking the windows. Let's start on the left side bookcase....
 I have a few pieces of my kids' artwork stored here, and since they are held on with clips, I can change them out easily. I am not a huge DIY gal, but these frames were a small project I tackled. I removed the glass from each frame, and then covered each backing with burlap. Then I just hot-glued a clip to the burlap!

 Down below in the cabinet, we store our card games & puzzles. Like I said, still have some empty storage space to be utilized down the line....
 My kids LOVE to play card games - Uno, Go Fish, and Old Maid are their current favorites - but they are pretty rough on the boxes. So I have put each card game into a baggie, and put a label on the front with the game name. And if there are any instructions, those go in the baggie too.
 Moving the right side bookcase....

 In the gray basket on the bottom shelf, we store the kids' electronics. This consists of a DS, Leap Pad, and 2 Kindles. I like to keep all the chargers in this basket as well, so the kids always know where they can find them. (THEY are in charge of charging their devices, not Mommy!)
 I corral the chargers with a simple twist tie, and made a label with washi tape.
 In the below cabinet, we keep cds - my husband refuses to part with them!! - as well as a case full of batteries and a stack of DS games.
 
Here is a close-up of our battery storage. This is just one of those craft/bead organizers from Michael's, and they're great because the dividers are easy to rearrange and I love all the compartments. Larger batteries, as well as a screwdriver, are stored in the wicker basket atop the battery case. (If you think it's random that we have batteries in the playroom, you must not have many toys. Somehow from day one, our kids' toys have always required a lot of batteries!)

 Moving onto the entertainment system.
 
I have seen this DVD storage system over & over on Pinterest, and I think it's great. But, truth be told, I prefer to keep it simple. The top shelf holds my son's movies, the middle shelf holds my daughter's movies, and the bottom shelf holds my husband's movies & a few Christmas ones. There is a little bit of overlap between my son & daughter tastes, but for the most part, they keep it organized this way. And I think it's easier to identify the movie if it's still in its case.
Now onto perhaps the best part of the playroom. Two closets - with doors so you can close them if you don't want to see all the toys! - flank the entrance to the room.

 The closet on the left holds:
1. 2 bins of adult games - Scrabble, Boggle, Balderdash, etc.
2. Kids' games
3. Bins with hanging chalkboard labels for: Cars, Horses, Wrestling Figures, Abby, Nate, Building Boards. (The "Abby" and "Nate" bins are my favorite because they hold all the miscellaneous junk my kids love - the stuff they get in Happy meals, at parties, etc. All the stuff they claim to not be able to live without!)
4. 2 large tubs that hold Weapons and Miscellaneous large toys.
I went with a simple gray & white theme, and all of the white bins are from the Dollar Store. The gray ones are from Target & TJ Maxx.
 The right side toy closet holds the following:
1. Workout mat & Outdoor stuff
2. Balls, Tea Set, Pokémon, Instruments, TMNT
3. Gears, Magnetix, Barbies, My Little Ponies, Princesses, Guns
4. Stroller, Pom-Poms, blue gymnastic mats, jumbo piano (like in the movie "Big!"), and a Nerf machine gun.
 Again, the bins came from Dollar Tree, Target, and TJ Maxx. I love the hanging chalkboard labels, because they are easy to change as your kids' toys change. I have found that sorting toys into categories really helps three things:
 
1. Kids can see their options.
2. Kids can find what they are looking for more easily.
3. Kids don't  have the excuse of saying "I don't know where it goes!" when it's clean-up time
 
(#3 is my favorite reason!)
One more little gem for you....since we don't have a huge or flat coffee table in the playroom, I keep an old bulletin board under the couch. We slide it out when we need a flat surface to play a game, do a puzzle, or build a creation. And then when we're done, just slide it back under the couch & out of sight!
This concludes the tour of our playroom. I hope you picked up some good tips! Leave a comment below with your favorite way you organize your playroom. (Or what you need help with!)


 photo 123-sig_zpsfaf346b8.jpg

Wednesday, January 28, 2015

Peek Inside: A Professional Organizer's House... {Abby's Room}

I got an overwhelming response last month when I had my first "Peek Inside" post. As a result, I've decided to go room-by-room in my house, and give you the specifics on what organizing methods I use. Today, my daughter's room is featured!
 
{Now, let me just give you a little background on Abby first. She is 5, going on 15. She's full of sass & personality, and has the most infectious laugh I've ever heard. She loves anything pink, dancing & singing in her room, playing dress-up, coloring, and pestering her older brother....}
The diva herself

Growing up, I was a huge tomboy - and still kinda am! - so the word "princess," and the color pink was just not in my vocabulary. It still isn't. But oh the things you will do for your daughter....
 
Zone 1: The Bed & Nightstands. I store a few space bags under Abby's bed, filled with clothes she has outgrown and I need to consign. As for the nightstands, I wanted them to have lots of storage, so each has a drawer and cabinet.
 The top right picture is Abby's "junk drawer".....I let her put whatever she wants in there, as long as it fits in that little bin. The top left picture has a container for all her bookmarks, and the purple case holds her Pokémon cards. (Yes, her brother is rubbing off on her a little bit!) The bird pillow is her Tooth Fairy pillow....haven't had to use it yet though. The books on the bottom left are ones we have been reading lately, and the picture on the bottom right holds her piggy bank, wallet, and cds (her clock doubles as a cd player/radio.)
 Zone 2: The Dresser. I'm pretty proud of this beauty, because I refinished it with a friend. (She even did a fabulous stencil on the side; look 2 pictures up!) We painted it a light gray with white hardware, and then I purchased the glass knobs at Hobby Lobby.
 I lined the drawers with metallic wrapping paper, just because I thought it was pretty! (And my daughter loves all things shiny.) I glued it on with a spray-on adhesive, like this one. The bins are from IKEA, and help to organize socks, leotards, underwear, and tights.
 This bow organizer was another DIY project of mine. I bought an old frame from Goodwill, spray- painted it, removed the glass, and hot glued pieces of thick white ribbon on the back. (The reason I used hot glue was because the frame is plastic. If you have a wood frame, I would recommend using a staple gun.)
 Zone 3: The Kitchen & Art Wall. I feel like this kitchen is a bit of an eyesore (Thanks Nanny!), but Abby loves it and plays with it constantly. When she outgrows it in another year or two, I'm picturing a white desk or maybe even a vanity in it's place.
Abby is pretty good about keeping the kitchen organized, so this is what it looks like on a good day! All the white bins are from The Dollar Store, and do a great job containing all of her "food."
 I created an Art Wall for Abby because she is constantly drawing pictures for her family, friends, and strangers on the street :) These are some of her current favorites, and the frames are super easy to change out at a moment's notice. Another great IKEA purchase! (Or you could get similar ones at Michael's when they are on sale.)
I purchased the watercolor in the middle from a friend...
let me know if you want her contact information!
 
Zone 4: The Closet. Wow, that's a lot of pink! I have Abby's dresses, and out-of-season short-sleeve shirts on the top bar, since she can't reach that high. Down below, I have her dress-up clothes (tucked in the left corner) and her long-sleeve shirts. She insists on picking out her clothes each day (and it's always a very colorful ensemble to say the least!), so it's important that she can reach the clothes herself. I also think *every* kids' closet needs a hanging organizer (far right). Abby's holds extra hangers, large & small blankets, and an extra set of sheets.

 The pink bins on the middle shelf are a lifesaver. In fact, I blogged about them a few months ago, in my "Tuesday Tip" post.  I've found that the easiest way to deal with the constant influx of clothes is to designate two bins in Abby's closet as follows: "Too Big" and "Too Small." Since I am a mom that loves to shop at consignment sales, as well as sell/consign my kids' clothes, these bins are a tremendous help with in those two areas! For example: when I buy something for the next season, it goes in the "Too Big" bin. And when I've decided those shorts are just toooo short, they go in the "Too Small" bin. (I previously mentioned that I have space bags under Abby's bed with out-of-season clothes. The pink bins will eventually be emptied into those; they just serve as a temporary holding spot when I'm in a rush.)
 
If you're wondering, I got the canvas bins from Target. And I created the labels using these name badges, Microsoft Word, and some scrapbook paper!
 
The first bin on the left is labeled "Summer," and holds swim suits & sandals.
 Looking up into Abby's closet, you will see a box labeled "cards", a basket for "quilts," and then the one on the far right is a memory box I gave to Abby on her first birthday. It holds a few special pictures, my hankie from my wedding, and a lock of hair from her first haircut.
 As previously mentioned, my daughter loooooves to play dress-up! I have her costumes tucked away into the left corner of her closet. She loves the easy access, but we are still working on her being able to correctly hang them back up. (Right now, I just ask her to put them in a pile when she's done with them.)
And here are her two bins - one has miscellaneous items like wands, boas, tiaras, etc. And the white bin holds all of her dress-up shoes. These she can definitely pick up & put back on her own.

 Zone 5: Bookshelf & Table Set. On the top shelf, I have hardback books of Abby's that are keepsakes or gifts (translation: she's not allowed to mess with them!). The bottom shelf holds the rest of her books, and her jewelry box. (Oh, how my girl loves to accessorize!) Again, these are right at her level and provide easy access.
The cabinet underneath holds her Legos. The two white bins are from The Dollar Tree, and I just cut up part of the boxes from each set so they could be easily identified. (If you've already thrown away the original packaging, just stick a chalkboard label on there with the name of the set, or print a picture off the internet.) The two clear bins inside the gray box hold Lego sets as well, just smaller ones.
 
Now, I know a lot of people tend to store Legos by color, but I have found that my kids prefer to store them in sets, so they don't have to go hunting around for pieces. To each his own! (When I feature my son's room, you will see that it was more of a challenge to create his Lego storage, since he has a gazillion sets!)
 Abby's table & chair set was a present from "Santa" this year, so we are still getting used to it. Right now, she's using it to display (& play with) her Lego sets after she assembles them. In the future, I see her using this for tea parties as well.
 
And the large basket in the corner holds all of Abby's "friends." Whenever the basket reaches capacity (which it pretty much is right now!), I tell her we have to donate a few or find a new home for them.


 Zone 6: The Bathroom. I told you my daughter was a diva, and she a bathroom attached to her room. (It was put in by the previous owners, right before we moved in 2 years ago. Score!)
 
I refinished the cabinet on the right, by painting it white and then giving the interior cabinet a coat of sea foam blue. I removed the glass from the cabinet doors and added chicken wire. And 300 cuts on my hands later, it was complete! :) The baskets are mostly used for extra hair accessories, nail polish, and combs/brushes.

And that concludes the tour of Abby's room. Stay tuned for more rooms in the upcoming months!


**I want to make it clear that - for the most part - these are staged pictures. My daughter is five years old, so her room is not this spotless all of the time! The main things I have her do to stay organized is to make her bed every morning, and then clean up her toys/dress-up clothes before bedtime. I'm happy with just those two chores, and I don't feel like it's asking too much of a five year old. So please just keep that in mind when you're viewing these pictures!**

If you'd like to share how your kids' keep their rooms clean, please leave a comment below. I'd love to hear from you!


 photo 123-sig_zpsfaf346b8.jpg

Friday, December 5, 2014

Reader Space: Organizing Kids' Artwork

A reader asked for help when it came to organizing & storing her son's artwork. And because he's only 2, you KNOW he is bringing home a masterpiece with handprints or doodles every.single.day!!
 
As a mom of two kids (age 5 & 7), I can sympathize. Luckily, there are oodles of ideas out there and here are a few of my favorites:

-Create a "brag board" (made out of an bulletin board, cork tiles, etc) for each child. These could hang in either a playroom or kitchen. Only place items on these boards that your child is *super* proud to show you. So... you might be changing them out every day :) But if they are tacked up with a pushpin, no big deal, right?!


{Source}
 
-A similar idea is to either make a DIY "Masterpiece" board like the one shown below, or hang a magnetic strip (from IKEA) with just a few favorite pieces displayed.
(This would also but cute done with clipboards or cork tiles).
{Source}

Again, these two ideas are mainly for "favorite" pieces. So what do you do with the other 105,834 pieces of artwork that come home with your child!? Well, if you want to get fancy, here are two options that I adore:

-You can purchase a collage made from your child's artwork! See the Etsy listing here.


Please look at how cute this is! It could easily
serve as artwork on the wall in your child's room.
 -Through www.plumprint.com, you can have your child's artwork turned into a coffee table book!!

......But, I must get back to my reader's original question :) 
She asked about two solutions - to hang a few favorite art pieces in frames, and then file the rest. To that I say: Bravo! That is exactly what I do, and it's been a great system for me so far.
In fact, here are pictures of my kids' "brag boards" in our playroom:
 

(I covered the backing of each frame with burlap, took out the glass, and hot-glued a clip}
 
....And our craft room:
 
...And then my daughter has a display in her bedroom, because she colors & draws 24/7:

{I got the frames at Michael's when they were on sale}
Those 3 places are where I display their most favorite pieces, as soon as they bring them home.
With the rest, I put into a double wall pocket, similar to the one shown here.
{This one is from IKEA, but there are other cute options at
Target, Amazon, Pottery Barn, and Hobby Lobby}
 
At the end of each week, I go through the wall pockets, and do an initial purge. (Again, I keep things that the kids seemed really proud of, or ones that demonstrated a new skill, like writing their name or perfectly their addition facts). Then, I file the "keepers" in a tub like the one shown below. 
(I purchased 2" expandable hanging file folders, and designated one for each grade. And I made the labels using Microsoft Word.)
 
{I found both the file boxes & hanging files at Office Max}
 
At the end of the year, the folder will be overflowing, so you will have to do a second purge. Believe me, at the end of the year, not every single thing with a handprint will deem necessary to keep. And....I'm gonna say it.....you have my permission to throw away some of your kids' artwork!! It does NOT make you a bad parent to do so. Most likely, they will never know the difference anyway :)
 
So, Becca, I hope that answers your question and that you can find a good solution for your son's endless supply of artwork. I would love to see what you come up with.
Good luck!


 photo 123-sig_zpsfaf346b8.jpg