Image Map
Showing posts with label drawer organizer. Show all posts

Wednesday, October 19, 2016

A Master Bathroom Makeover!

Y'all....it's official! I have finally found my dream master bathroom!

Seriously, it is the most beautiful thing and bigger than my bedroom. If I had a master bathroom like this, I think I'd take baths all day in the claw foot tub, and spend hours sitting at the pretty vanity getting ready.

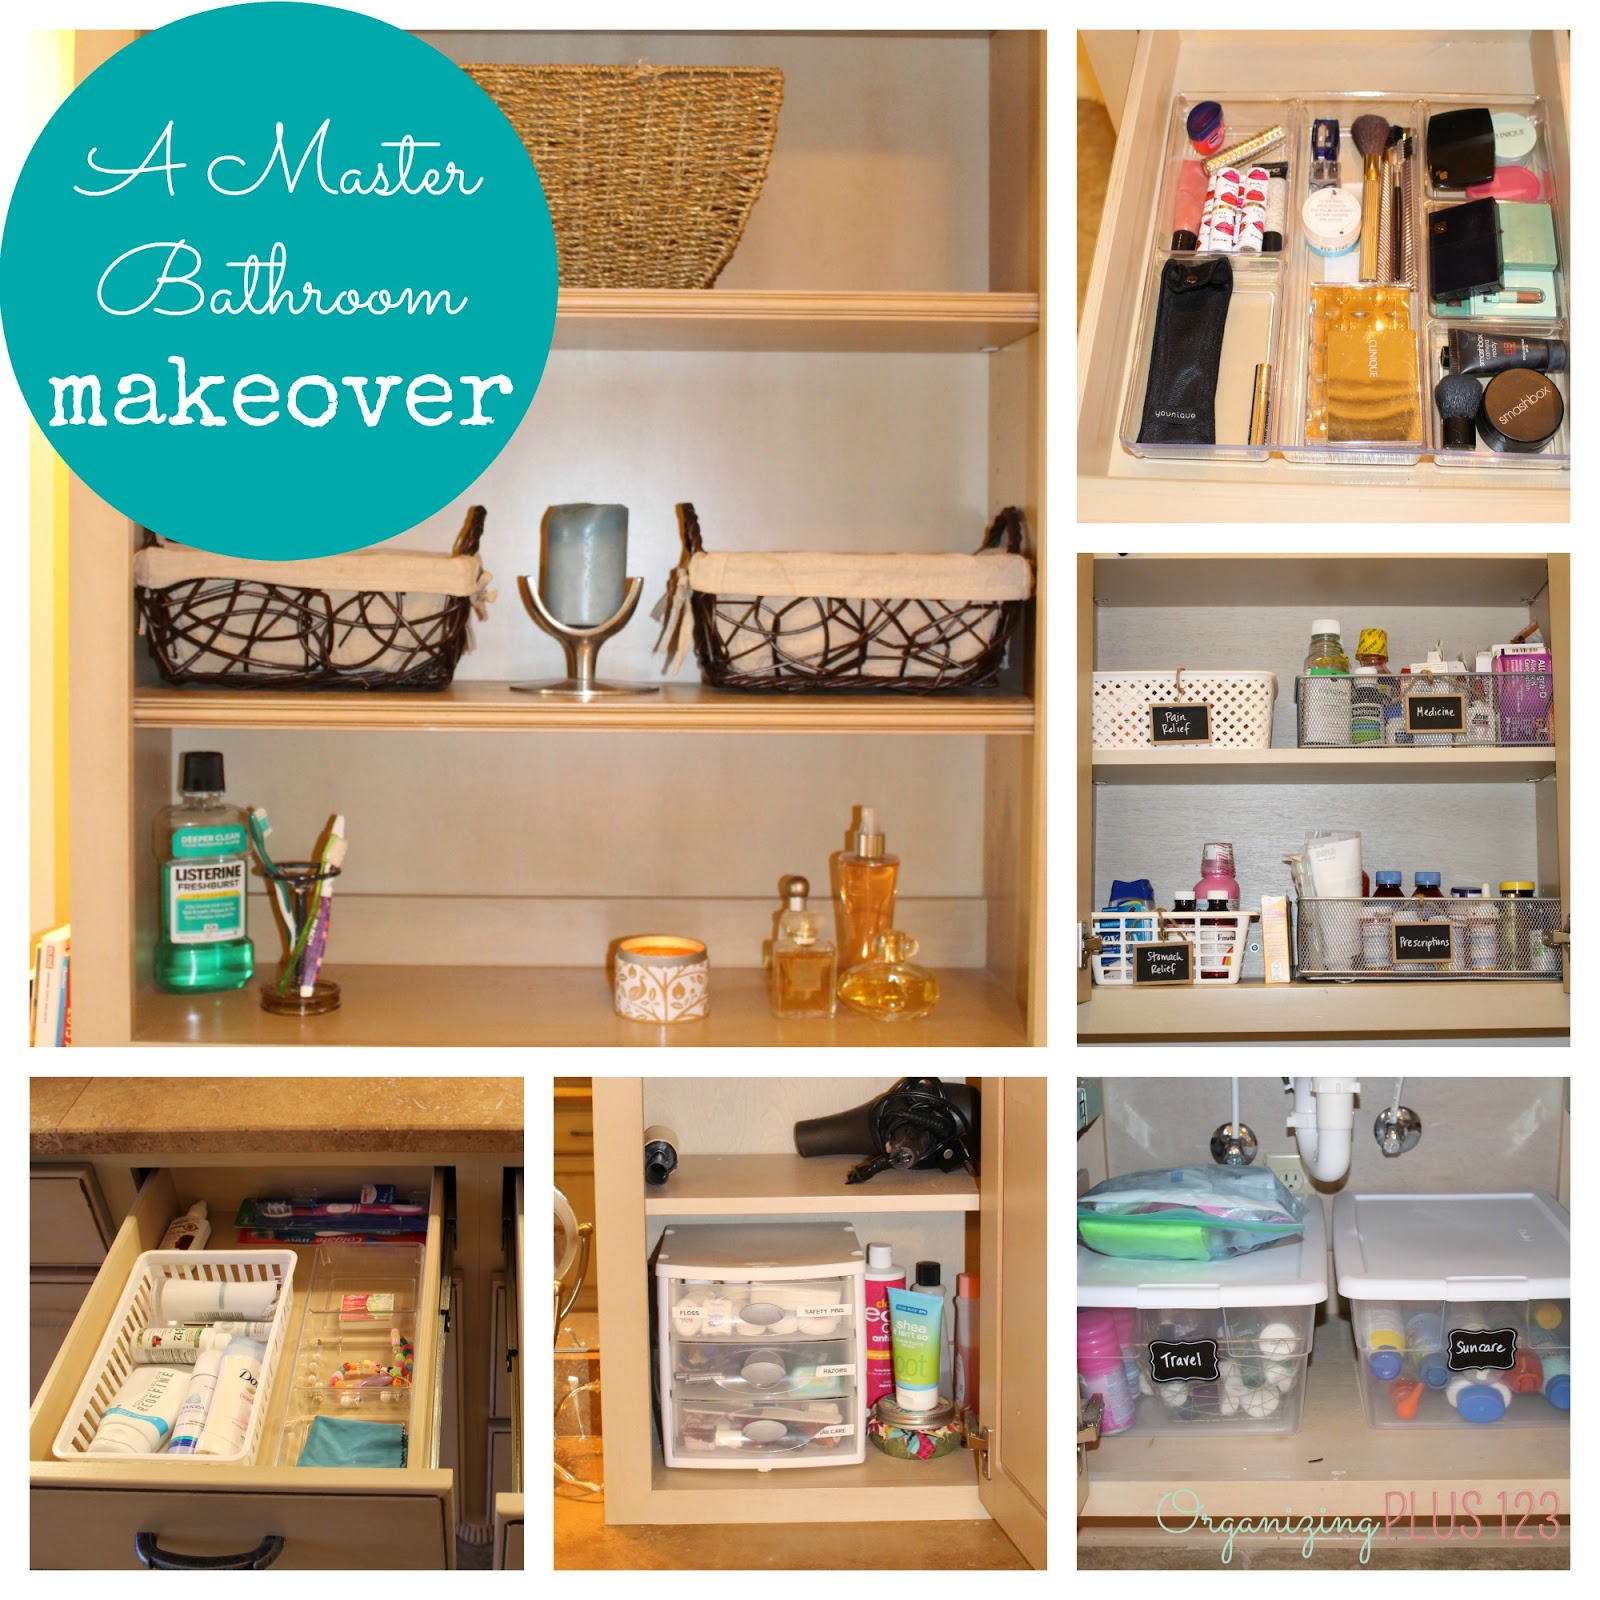
Needless to say, I had SO much fun helping a recent client de-clutter her bathroom....


The focal point right when you walk in is this beautiful open shelving & cabinet system. It was pretty much functioning as a medicine cabinet, so we decided to move those items
elsewhere and make it "pretty!"

Much better, right?!
 We created "Daily" and "Nightly" drawers for both husband & wife.
(Of course, the wife has a *few* more items in hers!)
We used simple bins from the Dollar Tree and acrylic dividers from Target.
Some of my faves!
Under one of the sinks, there was a little bit of everything. We created a Sun Care bin and a Travel bin, which holds all those travel-sized toiletries (and freebies you get from hotels)! My client travels often for work, so we left her large Ziplock bag ready made with travel toiletries for her next trip on top of the Travel bin.
 On the other side of the bathroom sits this amazing vanity!!! As you can see, it just was a little bit cluttered and didn't have a rhyme or reason to it. We transformed this spot by dedicating these shelves & drawers to all things "beauty".....hair tools & products, nail care, make-up, lotions, etc.
And the best part is - now she has empty shelves & room to grow!

Close-up on the shelving on the right

Close-up of shelving on the left
We just needed an acrylic organizer to hold all of her pretty make-up!
 Last but not least, there was a medicine cabinet over the toilet that was not being utilized properly. (I apologize - no "before" picture.) It was holding SOME of the family's medicine, but it was also spread out in 3 other locations in the house. We corralled it all, and I organized it into a few categories: Pain Relief, Stomach Relief, Medicine, and Prescriptions.
Now there is one central spot for medicine, and it's out of their children's reach.
Win-win!

Who would have thought that organizing a bathroom could be so much fun!?
(Well, my client may not have thought it was fun, but I did!)

 photo 123-sig_zpsfaf346b8.jpg

Tuesday, April 26, 2016

A Home Office Makeover

A recent client was overwhelmed with the amount of clutter & paper in her home office, so I was happy to help her simplify things :)
 
Truth be told, its hard to look thru every.single.piece.of.paper while we are de-cluttering an office. And this office held a lot of keepsake photos as well. So, I filled a small bin with "homework" for the client to look through after I left.....papers, personal information, and photos. (I created a file system in her filing drawer, so she can put the papers she wants to keep in there. And I left a few empty bins up top in the shelves to house the photos she decides to keep.)
 This desktop was hardly in working condition!! Thank goodness we were able to clear the clutter & restored it to a workable space.
 She has plenty of room to grow in these cabinets now....
 Office drawers and junk drawers are my favorite!!! I used a few acrylic drawer organizers and grouped together her stationary/mailing supplies, office supplies, and miscellaneous supplies.
Please give me call if your home office is in desperate need of a transformation! :)

 photo 123-sig_zpsfaf346b8.jpg

Saturday, April 16, 2016

Organizing Your Kitchen Cabinets

The majority of my clients are moms, and what is one room that every.single.mom spends a lot of time in???!? The kitchen. Whether it's for cooking, cleaning, washing dishes, packing lunches, or just clearing off the counters......a kitchen is a place where most women spend a good chunk of their day. Which is why it's so important for those cabinets & drawers to be organized!!

 
A recent client called on me to help organize her kitchen, because like mentioned above, she is a busy mom of 3 busy kids, and doesn't have time to de-clutter her kitchen. But oh how delighted she was for me to do it!! :)
 
This family is a big fan of Tervis Tumblers, as you can see below! I reorganized their drink cabinet to hold water bottles, sippy cups, and tumblers on the right side. (And I added a small white bin to hold all those pesky lids.) And on the left side of the "After" cabinet, I placed all of the other glasses, organized by type (of course).
Her cabinets with pyrex / corningware / mixing bowls weren't too bad, but just needed some tweaking. I think the biggest changes I made were to store the pyrex pieces by shape (rectangles go with rectangles, ovals with ovals....) and adding a basket to hold a few small pyrex lids.
 EVERYONE has a drawer with large utensils that could use a little TLC! My client was no exception. An expandable drawer organizer like this one did the trick, and will help keep the drawer from becoming a clutter magnet again.
 Not only are unorganized utensil drawers common, but so are junk drawers!!! Raise your hand if you have one in your kitchen! (My hand is raised.) There is nothing wrong with a junk drawer - they definitely serve a purpose. But who says a junk drawer can't be organized?! My poor client couldn't even pull her drawer out the whole way when I first got there :) I couldn't wait to get my hands on it....
 Now, this client had *many* other cabinets and drawers. And I touched them all. But just so I don't show off the entire contents of her kitchen, I thought I'd just highlight one more space..... the dreaded under-the-sink cabinet. It is a hotspot in most kitchens, and one that easily gets messy.
I just repurposed a few baskets the client already had, categorized the items, and purged a few. Nothing to it! The bottom basket now holds all small items like sponges, rags, and cleaning brushes.
 
Now that you've seen a few organized cabinets & drawers,
are you inspired to go de-clutter some of your own?!
 
 photo 123-sig_zpsfaf346b8.jpg

Monday, April 4, 2016

My Office Transformation

My office transformation has been a year in the making,
and today I'm finally ready to share it with you.....
My "before" desk was almost 20 years old (yes, it was my husband's when he was in college!), so I have desperately been wanting to replace it. But it took me some time to find exactly what I was looking for.

I found this beauty (and the chair!) on Overstock.com if anyone is wondering :) Plus, I was determined to get the printer off the desk, so I purchased an old filing cabinet and moved the printer on top. Add some desk organizers, a cute bulletin board, custom mouse pad off of Etsy.com and a lamp, and I was in business!

Next up, the drawers were in need of some TLC! I lined my new desk drawers with contact paper, and then purchased some simple acrylic drawer organizers from Target. (Plus, it helps that the new drawer is much wider!)

 Again, another acrylic divider with some contact paper, as well as Velcro straps to keep those pesky cords organized.
 The old bookcase help my scrapbooks, plus my kids' craft supplies. Well, we added a second bookcase to accommodate some of my work materials, and the kids ever-expanding craft stuff.
 The bookcase on the left holds my things, and the one on the right is for the kids. Most of the white containers are from the Dollar Store (!), the baskets are from TJ Maxx, and the thin black art boxes up top are from the Container Store. They hold my kids' XL art projects from school, etc.
 
The kids' stuff is divided into boxes/buckets for:
-paint
-stamps
-stickers
-sewing
-creations
-loose paper
-beads
-rainbow loom
-miscellaneous supplies
 
Yes, we like to "craft" in my house!!
I hope you like my office transformation! Please comment below if you have a question on a certain product & where I purchased it. Or, if you need any ideas on how to organize your office & craft supplies!
 photo 123-sig_zpsfaf346b8.jpg

Saturday, March 28, 2015

Organizing Your Teen's Desk: 11 Must-Haves

Do you have a teenage son with an unruly desk in his bedroom? Is it being overrun by Legos, clutter, puzzles, books, papers, or even dirty laundry?!
 
If so, it's time to clean that sucker off & start fresh....clear the clutter, and implement some new storage systems that will help your son to stay organized. It's important for your son to have a designated spot for homework, and if it's organized, I bet he'll be more willing to sit there and do it :) So, without further ado, here are 11 of my "must-haves" for organizing your teenage son's desk area:


1. Charging Station. Since every teenager these days has multiple devices, it's nice to have one place to corral them (and charge them at the same time). I love how this one conceals
all the cables with an easy lift-off lid.
 
2. Shelves. It's always best to maximize vertical space if possible, and a system of shelves (or even just one shelf) is the perfect solution over your son's desk. It's the perfect place for storage boxes, books, and even knick knacks. Just make sure the shelf or shelves are deep
 enough to hold the pieces you want!
 
3. File Box. Pop some hanging folders inside, and a file box is the ideal place to store important documents, notebook paper, and extra paperwork from school.
 
4. Metal Locker Bin. Concealed storage is key when dealing with clutter, and I love how this bin resembles an old-school metal locker.
 
5. Lamp. If your son's room doesn't have the best lighting, it's important to have a lamp to provide it. You know, just in case they're up late, burning the midnight oil & doing homework :)
 
6. Magazine File. My son is only 7 but already has two magazine subscriptions! I love these magazine files as a place to store their favorite issues.
 
7. Pencil Cup. You can never have enough pencils when it comes to homework...
 
8. Wall Organizing System. Whether it be a corkboard, dry-erase calendar, chalkboard, or memo board, it is essential to have some type of wall organizing system for your son. It's a good place to pin up weekly assignments & important reminders from school, or even just favorite pictures, mementos, or awards to personalize the space.
 
9. Storage Boxes. In my opinion, storage boxes are my #1 favorite organizing product. They are great for storing extra cords or miscellaneous items not used often.
 
10. Desktop Storage. In case your son's desk does not have a drawer, I adore this option for storing extra homework supplies. (Think: markers, scissors, ruler, and colored pencils.)
 
11. Drawer Organizers. Because ideally, the desk does have a drawer or two
to store homework supplies :)
 
 
*Just in case you need a little more inspiration on organizing your son's desk area, here ya go!*
{1 / 2 / 3 / 4}
And one more thing: I would advise having your son involved in both the de-cluttering & organizing process. Find out what his ideas are, his needs & wants, and what you can do to make it his new favorite place to be productive. Good luck!
 photo 123-sig_zpsfaf346b8.jpg

Sunday, March 22, 2015

How to Organize Legos

All month long, we've been discussing ways to keep your son's bedroom organized. Well, today, I want to talk about the "L" word.....Legos!
 
My son is 7, but has been interested in Legos since the age of 4. We knew early on that we wanted to store his Legos in his bedroom instead of the playroom. (The biggest reason for this was to keep the Legos out of his younger sister's hands - and mouth!)
 
Back then, he only had a box of miscellaneous Legos, we were able to have a small table like this with rolling storage underneath (the green bin), and that was sufficient.
 
Fast forward 3 years and now my son can put together 1000+ piece sets in a few hours. And he asks for them every birthday and Christmas! Obviously, I had to expand his Lego storage system.
 
Currently, this is the Lego corner in his room:
 Both of the drawer systems were purchased at Target. And my son decided he wanted to sort his Legos by BOTH color & by set. So I bought a ton of small red bins from the Dollar Tree, to act as drawer dividers. For each (small) set he has, I cut out a piece of the box with either a picture or name of the set & taped it to the bottom of each bin.
And then, in another part of my son's room, we have larger bins that hold the larger sets. Same idea - I cut out a piece of the box that shows a picture or the name of the set & taped it to the bins.
 This system is working for us right now, but I can't help but drool over these other options:

{1.} The IKEA Trofast system, with custom labels:
{Source}
 
{2.} A mobile Lego center, made from rolling drawer units, a 4 foot board, and a few Lego mats glued together. Genius!
{Source}

 
Because of my son's Lego obsession these past few years, 
I consider myself to be a Lego expert :)
Here are a few tips when organizing your child's Legos:

1. Allow room for growth.  Like I mentioned, I did not do this at the beginning. Which is okay, because I didn't know how big of a role Legos would play in my son's life. I started simple and then added onto the system once his collection expanded. And there is still room for more bins in his cabinet, so I feel like we can still accommodate a few more birthdays....

2. Designate a small bin as a "drop zone." My son has to clean up his room every night before bed, but I'm not such a stickler that every.single.lego.piece has to be in the correct colored bin every night. I have a small red bin in his drawer system that he can put miscellaneous pieces in, and then periodically go back to sort them & find their "home."
 
3. Displaying is important. No child wants to work hours on a creation, only for you to tell them to take it apart or put it away the next day. My son displays most of his creations on his desk, and also has a shelf above his bed. (Once they get too crowded though, I insist that he take few apart.) And here is another cute display option:
{Source}
4. Get your child involved. Ask if they'd rather have their Legos sorted by color or by set, and plan accordingly. Like I mentioned, we sort by BOTH color & set, and that was at my son's insistence. (He likes to be able to take apart a huge NinjaGo temple, put all the pieces in a bin, and know that when he's ready to rebuild it, all the pieces are already together. Clearly he got my OCD gene!)
 
5. Keep those manuals. I am the crazy person that keeps every single manual that enters our household.....for electronics, for toys, for appliances, you name it. While that may not be 100% necessary, I do know that those Lego manuals are important to keep! Sure, everything is online these days, but it's nice for your child to have them at their fingertips when needed. My son has his in the bottom drawer of his storage system, but I love this idea of putting them in a file box & using hanging folders to organize them:

{Source}
 photo 123-sig_zpsfaf346b8.jpg

Wednesday, January 28, 2015

Peek Inside: A Professional Organizer's House... {Abby's Room}

I got an overwhelming response last month when I had my first "Peek Inside" post. As a result, I've decided to go room-by-room in my house, and give you the specifics on what organizing methods I use. Today, my daughter's room is featured!
 
{Now, let me just give you a little background on Abby first. She is 5, going on 15. She's full of sass & personality, and has the most infectious laugh I've ever heard. She loves anything pink, dancing & singing in her room, playing dress-up, coloring, and pestering her older brother....}
The diva herself

Growing up, I was a huge tomboy - and still kinda am! - so the word "princess," and the color pink was just not in my vocabulary. It still isn't. But oh the things you will do for your daughter....
 
Zone 1: The Bed & Nightstands. I store a few space bags under Abby's bed, filled with clothes she has outgrown and I need to consign. As for the nightstands, I wanted them to have lots of storage, so each has a drawer and cabinet.
 The top right picture is Abby's "junk drawer".....I let her put whatever she wants in there, as long as it fits in that little bin. The top left picture has a container for all her bookmarks, and the purple case holds her Pokémon cards. (Yes, her brother is rubbing off on her a little bit!) The bird pillow is her Tooth Fairy pillow....haven't had to use it yet though. The books on the bottom left are ones we have been reading lately, and the picture on the bottom right holds her piggy bank, wallet, and cds (her clock doubles as a cd player/radio.)
 Zone 2: The Dresser. I'm pretty proud of this beauty, because I refinished it with a friend. (She even did a fabulous stencil on the side; look 2 pictures up!) We painted it a light gray with white hardware, and then I purchased the glass knobs at Hobby Lobby.
 I lined the drawers with metallic wrapping paper, just because I thought it was pretty! (And my daughter loves all things shiny.) I glued it on with a spray-on adhesive, like this one. The bins are from IKEA, and help to organize socks, leotards, underwear, and tights.
 This bow organizer was another DIY project of mine. I bought an old frame from Goodwill, spray- painted it, removed the glass, and hot glued pieces of thick white ribbon on the back. (The reason I used hot glue was because the frame is plastic. If you have a wood frame, I would recommend using a staple gun.)
 Zone 3: The Kitchen & Art Wall. I feel like this kitchen is a bit of an eyesore (Thanks Nanny!), but Abby loves it and plays with it constantly. When she outgrows it in another year or two, I'm picturing a white desk or maybe even a vanity in it's place.
Abby is pretty good about keeping the kitchen organized, so this is what it looks like on a good day! All the white bins are from The Dollar Store, and do a great job containing all of her "food."
 I created an Art Wall for Abby because she is constantly drawing pictures for her family, friends, and strangers on the street :) These are some of her current favorites, and the frames are super easy to change out at a moment's notice. Another great IKEA purchase! (Or you could get similar ones at Michael's when they are on sale.)
I purchased the watercolor in the middle from a friend...
let me know if you want her contact information!
 
Zone 4: The Closet. Wow, that's a lot of pink! I have Abby's dresses, and out-of-season short-sleeve shirts on the top bar, since she can't reach that high. Down below, I have her dress-up clothes (tucked in the left corner) and her long-sleeve shirts. She insists on picking out her clothes each day (and it's always a very colorful ensemble to say the least!), so it's important that she can reach the clothes herself. I also think *every* kids' closet needs a hanging organizer (far right). Abby's holds extra hangers, large & small blankets, and an extra set of sheets.

 The pink bins on the middle shelf are a lifesaver. In fact, I blogged about them a few months ago, in my "Tuesday Tip" post.  I've found that the easiest way to deal with the constant influx of clothes is to designate two bins in Abby's closet as follows: "Too Big" and "Too Small." Since I am a mom that loves to shop at consignment sales, as well as sell/consign my kids' clothes, these bins are a tremendous help with in those two areas! For example: when I buy something for the next season, it goes in the "Too Big" bin. And when I've decided those shorts are just toooo short, they go in the "Too Small" bin. (I previously mentioned that I have space bags under Abby's bed with out-of-season clothes. The pink bins will eventually be emptied into those; they just serve as a temporary holding spot when I'm in a rush.)
 
If you're wondering, I got the canvas bins from Target. And I created the labels using these name badges, Microsoft Word, and some scrapbook paper!
 
The first bin on the left is labeled "Summer," and holds swim suits & sandals.
 Looking up into Abby's closet, you will see a box labeled "cards", a basket for "quilts," and then the one on the far right is a memory box I gave to Abby on her first birthday. It holds a few special pictures, my hankie from my wedding, and a lock of hair from her first haircut.
 As previously mentioned, my daughter loooooves to play dress-up! I have her costumes tucked away into the left corner of her closet. She loves the easy access, but we are still working on her being able to correctly hang them back up. (Right now, I just ask her to put them in a pile when she's done with them.)
And here are her two bins - one has miscellaneous items like wands, boas, tiaras, etc. And the white bin holds all of her dress-up shoes. These she can definitely pick up & put back on her own.

 Zone 5: Bookshelf & Table Set. On the top shelf, I have hardback books of Abby's that are keepsakes or gifts (translation: she's not allowed to mess with them!). The bottom shelf holds the rest of her books, and her jewelry box. (Oh, how my girl loves to accessorize!) Again, these are right at her level and provide easy access.
The cabinet underneath holds her Legos. The two white bins are from The Dollar Tree, and I just cut up part of the boxes from each set so they could be easily identified. (If you've already thrown away the original packaging, just stick a chalkboard label on there with the name of the set, or print a picture off the internet.) The two clear bins inside the gray box hold Lego sets as well, just smaller ones.
 
Now, I know a lot of people tend to store Legos by color, but I have found that my kids prefer to store them in sets, so they don't have to go hunting around for pieces. To each his own! (When I feature my son's room, you will see that it was more of a challenge to create his Lego storage, since he has a gazillion sets!)
 Abby's table & chair set was a present from "Santa" this year, so we are still getting used to it. Right now, she's using it to display (& play with) her Lego sets after she assembles them. In the future, I see her using this for tea parties as well.
 
And the large basket in the corner holds all of Abby's "friends." Whenever the basket reaches capacity (which it pretty much is right now!), I tell her we have to donate a few or find a new home for them.


 Zone 6: The Bathroom. I told you my daughter was a diva, and she a bathroom attached to her room. (It was put in by the previous owners, right before we moved in 2 years ago. Score!)
 
I refinished the cabinet on the right, by painting it white and then giving the interior cabinet a coat of sea foam blue. I removed the glass from the cabinet doors and added chicken wire. And 300 cuts on my hands later, it was complete! :) The baskets are mostly used for extra hair accessories, nail polish, and combs/brushes.

And that concludes the tour of Abby's room. Stay tuned for more rooms in the upcoming months!


**I want to make it clear that - for the most part - these are staged pictures. My daughter is five years old, so her room is not this spotless all of the time! The main things I have her do to stay organized is to make her bed every morning, and then clean up her toys/dress-up clothes before bedtime. I'm happy with just those two chores, and I don't feel like it's asking too much of a five year old. So please just keep that in mind when you're viewing these pictures!**

If you'd like to share how your kids' keep their rooms clean, please leave a comment below. I'd love to hear from you!


 photo 123-sig_zpsfaf346b8.jpg